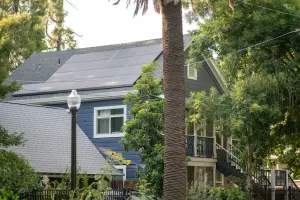
A roof drip edge is a thin metal flashing installed along the eaves and rakes of your roof to steer water away from the fascia and into the gutters, protecting the roof deck, soffits, and siding from wind-driven rain. In Washington’s wet, gusty climate, the roof drip edge reduces leaks, rot, and ice dams (when it happens in the Cascades). It’s required by residential code for asphalt shingle roofs, and when it’s sized and installed right, the roof drip edge also improves gutter performance and the roof’s lifespan.
Why a Drip Edge Matters in Washington’s Climate
We live with long stretches of drizzle and the occasional atmospheric river that feels like a firehose. That combination, high precipitation and wind, pushes water under the roofing materials and against fascia boards. A drip edge breaks surface tension, so water sheds cleanly, not backtracking under the roofing materials.
Here’s what we see on Seattle and Eastside roofs without proper drip edges. The plywood at the eaves gets dark and soft. Paint on the fascia bubbles, then peels. Gutters overflow more often because water clings to the roof edge instead of dropping into the trough. Over a couple of winters, that adds up to expensive repairs, sometimes mold in the soffit. Not dramatic on day one, but it snowballs.
And winds matter. The National Weather Service notes frequent windy systems from October to March: we all felt last November’s blasts, the kind that lift roof corners. With a drip edge tucked correctly under the underlayment and over the starter course, we add wind resistance at the perimeter. The metal flashing acts like a small anchor line along the roof edge, which, frankly, is where roofs fail first.
By the way, energy and moisture go hand in hand here. Wet drip edges mean colder drip edges. That can trigger condensation in the attic at the eaves if ventilation is marginal. A well-installed drip edge won’t fix a bad vent layout, sure, but it keeps liquid water out so the roofing system can do its job. We’ve seen this subtle benefit in Ballard bungalows and Sammamish two-stories alike.
Where a Drip Edge Goes: Eaves, Rakes, and Gutters
Let’s map the drip edges. At the eaves, the low horizontal drip edges where gutters hang, the drip edge tucks under the ice-and-water shield (or underlayment) and sits on top of the roof sheathing. It projects past the fascia so water releases into the gutter. At the rakes, the sloped rake edges at the gable ends, the drip edge sits over the underlayment, not under it, because we’re fighting wind uplift more than ice there.
We sometimes get asked, do you put it behind the gutter? No. The gutter mounts to the fascia: the drip edge sits above and in front, creating a lip that sends water into the gutter trough. When gutters are high, we adjust the overhang and drip edge profile so water doesn’t jump past the gutter during heavy downpours.
Eaves first, rakes next. That’s the simple mental model. And in older homes around Shoreline or West Seattle, we sometimes run a small kick at the bottom roof edge to save original fascia that’s still in good shape.
How It Works With Gutters and Fascia
Gutters and drip edge are teammates. Water rides the roofing material, hits the metal drip edge, breaks clean, and falls into the gutter. If the drip edge is too short, water curls back and stains the fascia. If it’s too long or the angle’s wrong, fast rain can overshoot the gutter. We correct that by matching the drip edge profile to the gutter size, K-style 5-inch gutters prefer a slightly longer nose or an F-style drip edge.
We aim for a 1/4 to 3/8 inch roofing material overhang beyond the drip edge. That small overhang helps water release cleanly. And we leave a modest gap between the back of the gutter and the fascia if we’re using a gutter apron style, so debris doesn’t pack in and hold moisture against the wood. Little details, big difference during a Pineapple Express storm.
Drip Edge Materials and Profiles
You’ve probably seen the thin silver or painted strip peeking out at the roof’s edge. Not all metal is the same, though, and the shape, called the drip edge profile, matters for performance and looks.
Common materials and their pros and cons
- Aluminum (0.019–0.024 inch): Lightweight, cost-effective, and widely available pre-finished in colors to match fascia. It resists corrosion well in our marine air if it’s painted or coated. It’s our go-to for most asphalt roofing projects.
- Galvanized steel (26–28 gauge): Stronger than thin aluminum and less likely to warp. Needs a solid galvanic coating and preferably paint to resist rust. Near salt spray or exposed waterfront, we’re cautious unless finish quality is top-tier.
- Copper (16–20 oz): Beautiful and long-lived, especially on custom homes or historic restorations on Queen Anne. It patinas, which we actually like. Pricey, and you want compatible fasteners to avoid galvanic corrosion.
- Stainless steel: Very durable in marine environments, but overkill for most residential projects and, honestly, not budget friendly.
We avoid mixing metals. Copper and aluminum don’t play nice together when wet: that electrochemical mismatch can chew through material over time.
Profile shapes (C/L, D/T, and F) and when to use each
The common alphabet soup:
- C or L profile: A simple 90-degree leg with a small drip hem. Clean look, fine for many eaves. We use it where gutters are well-aligned and the fascia is straight.
- D or T profile: Larger top flange with a deeper nose. Good where we need extra stiffness or to bridge uneven roof sheathing in older homes. It also helps keep fast rain from crawling back.
- F style (a.k.a. gutter apron): Extended face that overlaps into the gutter more. We favor F at eaves with 5- or 6-inch K-style gutters, especially on two-story homes where wind can carry water.
At rakes, we sometimes prefer a stiffer D/T profile because it resists wind and looks substantial along a gable end. We’ll match the profile with the gutter and the fascia trim depth so lines look tidy from the street. Curb appeal, yes, but also directing water.
Sizing, overhang, and finish options
Sizing is basically how wide the horizontal and vertical legs are. We like a minimum of 2 inches on the roof deck leg and 1–1.5 inches down the fascia face at eaves. Overhang off the fascia is small, just enough to create a drip line over the gutter bead. Roofing material overhang beyond the metal drip edge stays around 1/4–3/8 inch.
Finishes range from mill (bare) to factory-painted. In Puget Sound, pre-finished aluminum in a color-matched fascia tone holds up really well. Dark colors hide staining: whites look crisp but show dirt. Copper? It’s its own statement, gorgeous, a bit proud, we admit.
Code and Best Practices in Washington
Washington adopts the International Residential Code with state amendments. For asphalt shingle roofs, the IRC requires a drip edge at eaves and rake edges, with specific installation details that we follow on every job.
What the building code requires
Under the 2021 IRC R905.2.8.5, drip edge shall be provided at eaves and rakes, fastened at max 12 inches on center, and extend a minimum of 0.25 inch below the roof sheathing with a flange at least 2 inches. Eave drip edge goes under the underlayment: rake drip edge goes over the underlayment. Seams must be lapped. Washington jurisdictions reference this language in their local building codes.
When you must add or replace a drip edge
When replacing a roof, if an existing drip edge is missing, damaged, or too short to properly drain into the gutter, we perform drip edge replacement. If you’re upgrading gutters or fascia thickness, we often switch from a type C drip edge to an F apron to keep water aligned. If there’s rot at the eaves, we repair the roof deck, then install a new drip edge, as installing over rot isn’t even legal or wise.
Permits, inspections, and documentation
Many cities in our region don’t require a permit for like-for-like roof replacement on one- and two-family homes, but building codes still apply. Seattle’s SDCI notes that basic roofing replacement typically doesn’t need a building permit unless you’re altering the structure.
Even without a permit, we document drip edge installation in photos for your records and manufacturer warranties. For HOAs, that paperwork helps, too. And in cities like Bellevue or Kirkland, inspectors may still look during a broader remodel. As a roofing company serving the entire Puget Sound area of Washington, we align with their standards regardless.
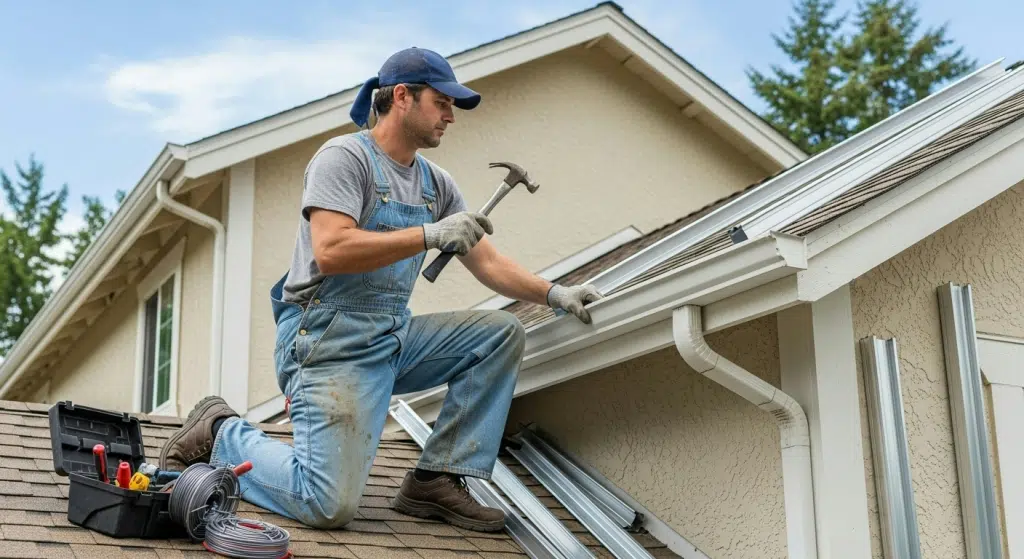
Installation Basics and Common Mistakes
Drip edge is simple on paper, but the drip edges are where little missteps become leaks. Here’s the short version of how we build it and what to avoid.
Correct order at eaves and rakes
At eaves: roof sheathing, ice-and-water shield or underlayment layer one, then the drip edge set flush and straight, then the starter strip and roofing materials. Some manufacturers allow underlayment over the drip edge at the eaves: in our wet zone, we prefer shield under the metal flashing with a light bead of sealant at overlaps. It keeps wind-driven rain from wicking back under the roof deck.
At rakes: underlayment first, then the drip edge on top. This order gives the metal flashing direct contact with the starter and stiffens the roof’s edge against wind. We snug corners with a neat lap so there’s no capillary gap.
Fasteners, sealing joints, and wind protection
We use corrosion-resistant roofing nails, galvanized or stainless, to match the metal. Roofing nails set 12 inches on center (closer near corners), about 1 inch up from the drip hem, never through the very tip where water collects. Seams overlap 2 inches minimum, and we bed those laps in compatible sealant, not a glob, just a thin line so it doesn’t ooze.
For coastal exposures or open lots in Snohomish County where gusts hit hard, we tighten the nail spacing to 8 inches on center at rake edges. Starter gets full adhesive bond to the metal flashing installed. These tiny upgrades pay off the first time a 45-mph south wind barrels up I-5.
Mistakes that lead to leaks, rot, or gutter issues
We see four repeat offenders:
- Short overhang: Water curls behind and soaks fascia boards. Paint peels fast.
- Wrong order: Underlayment over the drip edge at eaves invites leaks. Flip that, and it sheds.
- Mixed metals: Copper against bare aluminum fasteners, hello, corrosion. To prevent rust, use corrosion resistant materials.
- Gutter misalignment: The drip edge nose should point into the gutter, not behind it. If gutters were hung high, we would switch to an extended drip edge or reset the brackets.
And I almost forgot to mention: wavy fascia board. If the backing isn’t straight, even perfect drip metal will look crooked. We shim or replace as needed so the line is clean. Use tin snips for cutting, and a flat pry bar for removal if needed.
Maintenance, Troubleshooting, and When to Replace
A drip edge doesn’t ask for much. Still, a quick peek once or twice a year prevents small issues from turning into wood rot.
Simple seasonal checks you can do safely
From the ground or a sturdy ladder, don’t push it on wet days, look under the eaves for staining on the fascia boards, peeling paint, or algae trails. After a heavy rain, watch how water droplets drop into the gutters. Is it shooting past in spots? That can mean the drip edge profile isn’t matched to the gutter or the gutter pitch is off.
In the attic, check the first 12–18 inches above the exterior walls for darkened plywood or damp insulation. Musty smell? That’s a sign water has been sneaking in at the edge of the roof. We recommend this quick sniff test every fall.
Signs of trouble and what they mean
- Rust or oxidation on the drip edge face: finish failure or incompatible fasteners.
- Gaps at joints: thermal cycling opened the seam, re-seal or replace the section.
- Water between the gutter and fascia: either the drip edge is too short, or the gutter apron is missing. Sometimes it’s just a sagging hanger.
- Soft fascia: the damage is done: we’ll need to repair wood and reset the drip edge.
By the way, tiny icicles at the eaves in colder pockets (Issaquah plateau, North Bend) can show poor insulation/venting. Drip edge won’t cure ice dams, but it keeps meltwater from running behind the fascia board. Direct water away from the fascia to prevent water infiltration.
Repair vs. replacement: What’s worth it
If the metal is intact and just short, we can often add an F-style apron under the roofing materials at the eaves without a full roof replacement. If corrosion is widespread or roofing materials are nearing end of life, it’s actually better to replace during roofing project so we rebuild the roof edge correctly from roof deck up.
Most professionals agree: pair drip edge replacement with roofing replacement for best value. We’ve tried piecemeal fixes, and sometimes they hold: other times, you chase leak gremlins for months. Honest answer, we’ll tell you which path makes sense after a quick site look. Contact a roofing professional or roofing contractor for advice.
Cost, Warranties, and Selecting a Contractor
Talking price without seeing the home is always a little wobbly, but we can give useful ranges and the big levers that move them.
Typical cost factors and what affects price
On a standard Puget Sound home, drip edge materials during a roofing project usually runs a few dollars per linear foot installed. The total depends on:
- Material choice (painted aluminum vs. copper)
- Profile type (F apron can be slightly more)
- Accessibility (two-story eaves, steep pitch, lots of gables)
- Related repairs (fascia or roof decking replacement)
As a rough, candid ballpark, adding or replacing drip edge flashing as part of a full asphalt shingle roof might account for $300–$900 of the job on an average single-family home, more with copper or complex drip edges. If we’re doing a small repair section, mobilization costs can make a short run feel pricier per foot, which, honestly, surprises folks.
Questions to ask a roofer before you hire
- Will you install drip edge flashing at both eaves and rake edges to current code, and can you show me the detail? Ask for a quick sketch or a photo of their recent work.
- What drip edge profile are you using with my gutters, and how much roofing overhang do you target?
- Are you lapping and sealing joints, and what fasteners will you use with this metal?
- If you find fascia damage, how do you price and perform repairs?
We encourage homeowners to compare apples to apples. If a quote skips drip edges, it’s not a bargain, it’s a risk. And yes, you can absolutely ask us for photos mid-install. We take them anyway for records and manufacturer warranties.
Warranties, materials, and proof of insurance
Manufacturer warranties for roofing expect drip edges and proper roofing underlayments details. Without them, claims can get sticky.
From our side, you want two protections: a workmanship warranty in writing and proof of active Washington contractor registration, bonding, and insurance.
We work across Seattle, Bellevue, Tacoma, Everett, really the whole region. If you’re outside the map, still ask: sometimes we can fit it in, weather permitting.
Conclusion
So, what is a roof drip edge, really? It’s small metal flashing that does quiet, unglamorous work: guides water into gutters, shields the roof deck edge, stiffens the perimeter against strong winds. In Washington’s rainy corridor, that little line of metal saves fascia boards, keeps soffits dry, and helps roofing warranties hold up.
If you’re weighing a roof project this season, don’t skip the drip edges. We’ll match drip edge profiles to your gutters, align with most building codes, and document the whole process. And if you want a quick check before the storms stack up, we can swing by most neighborhoods around Puget Sound. One hour now can prevent a winter of drip, drip, drip later.
Frequently Asked Questions
What is a roof drip edge and why is it required?
A roof drip edge is a thin metal flashing installed along eaves and rake edges that guides water into gutters and away from the fascia, soffits, and roof decking. In Washington’s windy, rainy climate, it limits leaks and wood rot. The IRC requires drip edges on shingle roofs for code and warranty compliance.
How is a drip edge installed at eaves vs. rakes?
At eaves, drip edge goes under the ice-and-water shield or first underlayment layer and over the roof sheathing, projecting into the gutter. At rakes, it goes over the underlayment to resist wind uplift. Lap seams, fasten about every 12 inches (tighter in high-wind zones), and maintain a 1/4–3/8 inch roofing overhang.
Which drip edge profile works best with K-style gutters?
An F-style (gutter apron) often pairs best with 5–6 inch K-style gutters because its extended drip edge overlaps into the trough, reducing overshoot during heavy downpours. C/L profiles suit straight fascia and aligned gutters; D/T profiles add stiffness and help prevent water from crawling back on older or uneven eaves and rakes. Type C drip edge is simple, type D is stiffer, type F is extended.
Do I need to replace a roof drip edge when reroofing or changing gutters?
Yes, replace missing, damaged drip edge, corroded, or too-short drip edge during reroofing. Upgrading to thicker fascia or new gutters often calls for switching to an F-style gutter apron for proper alignment. Repair any eave rot before installing new drip edge. Proper drip edges are typically needed for roofing manufacturer warranties and building codes compliance.
Does a drip edge prevent ice dams or attic condensation?
A drip edge doesn’t stop ice dams or fix poor ventilation, but it helps keep meltwater from running behind fascia boards and reduces wind-driven rain intrusion. Prevent ice dams with balanced attic insulation and ventilation. In Washington’s colder pockets, a proper drip edge complements, but doesn’t replace, good thermal and airflow design. Without a drip edge, water can cause more damage from severe weather or strong wind.
How much does a roof drip edge cost to add or replace?
As part of a full asphalt roof, drip edge typically adds a few dollars per linear foot, roughly $300–$900 on an average Puget Sound home. Costs rise with copper, complex drip edges, steep pitches, or repairs. Small stand-alone fixes can feel pricier per foot due to mobilization and access time. Aluminum drip edges are common, metal drip edges vary, vinyl drip edges less used, t-style drip edges or l-style for specific needs.